I want to help serious gamers and streamers move past console limits and record professional footage. In 2025, over 128 million players expect crisp video and reliable streaming tools. I tested top devices that bridge consoles and PCs, focusing on HDMI output, stable USB connection, and clean audio sync.
Whether you use a laptop or a desktop, the right choice makes a huge difference. My guide explains how these devices turn your gameplay into high-resolution video and how they fit into a full streaming setup with a DSLR or webcam.
I analyzed performance, resolution options, and ease of use so you can pick the best option for your platform and budget. Expect clear advice on connection types, monitor output, and which device suits a rising streamer.
Key Takeaways
- High-quality capture gear removes the 30-second recording barrier on consoles.
- Look for stable HDMI and USB links to keep video and audio synced.
- Choose devices that match your laptop or desktop setup for best performance.
- Resolution and low-latency output matter most for streaming and recorded footage.
- I tested top options to help you balance price, quality, and ease of use.
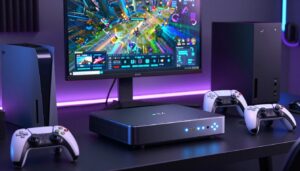
Why You Need a Capture Card for Nintendo Switch
I often see creators frustrated by the console’s tiny recorder. The built-in tool only saves 30 seconds at 720p, so it cannot handle long streams or edited videos.
Beyond the Recording Limit
That 30-second ceiling kills momentum. I found that you need a capture card to bypass the limit and record hours of high-quality gameplay to your computer.
With the right device, your HDMI feed becomes a reliable video source. You gain full-length footage and control over output and quality.
Unlocking Professional Stream Features
Once the console audio and video route into my PC, I can use professional streaming software to add overlays, alerts, and a facecam.
That setup also fixes sync issues. I recommend every serious gamer invest time in a device that supports clean audio and video. The payoff shows on your monitor and on any streaming platform.
- Longer recordings: Hours, not seconds.
- Software integration: Overlays, scenes, and alerts.
- Tight sync: Audio and video line up for viewers.
Understanding Key Technical Specifications
Understanding the numbers — resolution, frame rate, and ports — saves you time and money when selecting gear.
Resolution and frame rate are the most critical specs for high-quality video output. I look for devices that record clean 60 fps at full HD, and ideally support 4K60 passthrough so your monitor shows the best image while the computer records.
A reliable HDMI port is non-negotiable. It keeps the console signal stable during long streaming sessions and prevents dropped frames that ruin footage.
Connection type matters too. USB 3.0 or better moves large video files quickly to your PC. Zero-lag passthrough is essential for competitive gamers who need real-time response on their monitor.
- Future-proof: choose devices that handle current consoles and higher resolutions.
- Dual output: send video to your monitor and to the computer simultaneously.
- Check features: prioritize frame rate, HDMI reliability, and low latency.
Essential Features for Modern Streamers
I focus on the features that keep a live show smooth and professional. Low latency, clean audio routing, and reliable video output matter most to me.
The Importance of Zero-Lag Passthrough
Zero-lag passthrough is a must-have. It delivers sub-1ms latency to your gaming monitor so your reflexes stay intact during competitive play.
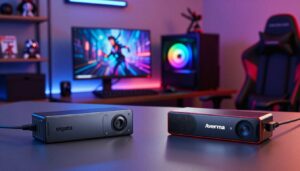
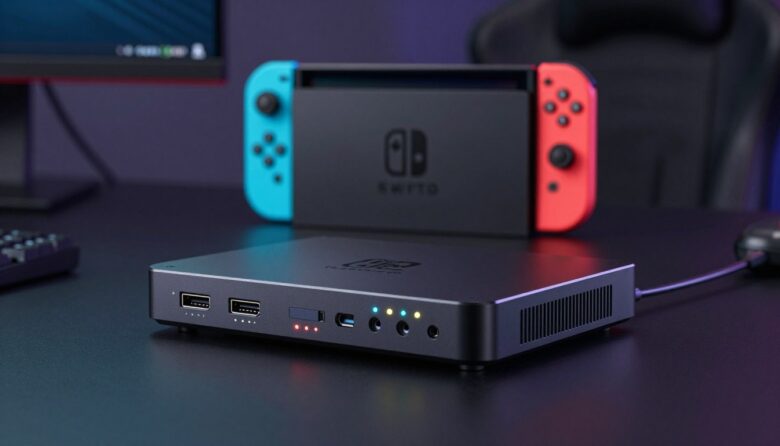
The NearStream CCD30 highlights why hardware choices matter: it offers a 3.5mm audio port that simplifies direct mic input and reduces setup time.
- I recommend a capture device with USB 3.0 support so video footage moves to your streaming software without dropped frames.
- Look for 4K60 passthrough to keep your monitor showing the highest quality while your PC handles the recording.
- Choose gear that acts as a single source for both audio and video to save time and avoid sync problems.
Bottom line: a modern streamer needs a small set of reliable features — zero-lag passthrough, a handy audio port, HDMI stability, and software compatibility — to make gameplay look and sound pro on every platform.
The Best Capture Card for Nintendo Switch Options
My top picks balance performance, price, and features so you get pro-grade footage without guesswork.
I recommend the NearStream CCD30 as my top choice. It offers 4K60 passthrough and 4K60 capture, which keeps your monitor output crisp while recording high-resolution footage to your PC.
The Elgato HD60 X remains a reliable option. Many streamers like it despite its 4K30 capture limit. It still delivers solid HDMI stability and easy USB integration.
- AVerMedia Live Gamer 4K (GC573): a powerful internal PCIe option for those on a tighter budget who want strong performance.
- Each device listed gives a stable HDMI connection to protect video quality during long sessions.
- Pick based on your console—whether a Switch or an Xbox One—and the resolution you need.
Bottom line: choose the device that matches your setup and workflow. The right option ensures clean output, low latency, and reliable footage for streaming and editing.
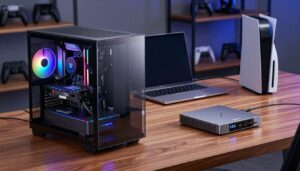
Comparing Internal Versus External Hardware
Choosing between an internal or external model changes how you build a streaming setup and where you record your footage.
I install internal devices directly into a PCIe slot on my desktop when I want the fastest, most reliable link for console gameplay. An internal unit often costs less and keeps the USB bandwidth free on my computer.
By contrast, an external device shines if I use a laptop or need portability. I can move a small box between an Xbox One, my laptop, and my spare computer without opening any cases.
Both options need a stable HDMI line to preserve video quality and avoid dropped frames. Whether internal or external, the end footage and monitor output can match if the device supports the same specs.
- Desktop users: internal offers lower latency and good value when a PCIe port is available.
- Mobile streamers: external gives flexibility and easy swapping between consoles and computers.
- Budget note: internal units typically cost less, but check port availability first.
Setting Up Your Streaming Hardware
I start every stream by checking the physical links. A solid connection prevents most issues and keeps my setup reliable.

Connecting Your Console
To begin, connect the HDMI cable from the Switch dock to the input port on your capture card. Then plug a high-quality USB 3.0 cable between the device and your laptop or desktop.
Use stable cables and firm port connections. Loose HDMI or USB plugs cause dropped frames and sync problems. I always test video output on my monitor before opening streaming software.
Managing Audio Inputs
Next, route console sound into your streaming software through the device’s audio input. A good capture card lets you mix game audio and mic levels inside your software without extra hardware.
Always run an audio check before you go live. Verify in-game sound, mic volume, and desktop alerts to avoid surprises during the broadcast.
| Step | What to use | Quick test |
|---|---|---|
| Video link | HDMI cable to device input | Monitor shows gameplay |
| PC connection | USB 3.0 cable to laptop/desktop | Device appears in software |
| Audio routing | Device audio input / software mix | Levels visible in mixer |
| Final check | All cables tidy and secure | Record a 30s test clip |
Configuring Your Streaming Software
Proper setup turns a connected device into a stable video and audio source that your audience sees and hears. I use OBS Studio as my go-to because it recognizes devices reliably and gives fine control over resolution and frame rate.
Start by adding the capture device as a new source in OBS. Choose the right resolution and 60 fps if your hardware and platform support it.
Next, manage audio settings. I set the device as the primary audio input so game sound appears in my mixer. Then I enable monitoring to listen in real time and catch sync issues early.
Check the HDMI signal and any loose cables at the port if the feed drops. Every capture card I use needs a quick, device-specific tweak in software to capture the HDMI feed cleanly.
“Take time to verify both video and audio are selected as primary sources—this one step prevents most streaming headaches.”
- Confirm device appears as a video source.
- Match resolution and frame rate to your stream settings.
- Set the device as primary audio and enable monitoring.
Do this once and your setup will stay stable across sessions. Proper configuration makes your Nintendo Switch gameplay look and sound professional on any platform you choose.
Troubleshooting Common Performance Issues
Troubleshooting performance problems starts with a short checklist I run before every session. This saves time and avoids ugly surprises when I go live.

Fixing Color and Signal Problems
If you see a black screen, first confirm the HDMI cable runs from the switch dock into the input port on your capture card. A loose plug or frayed cable is often the culprit.
Next, check the USB 3.0 connection. I find most issues clear up when I reseat the USB cable and try a different port on my PC.
If the device does not work, reconnect the console and restart your streaming software to force a fresh signal. That simple step refreshes drivers and clears temporary conflicts.
Color shifts usually come from software settings. I adjust the input format and color space in my streaming app and test again. Keeping drivers updated helps the device work reliably.
- Verify audio and video sources in your software before streaming.
- Try an alternate HDMI cable or port if the screen shows artifacts.
- Remember: a quality capture card makes gameplay smooth, but you must troubleshoot minor faults when they appear.
Final Thoughts on Your Streaming Journey
I want this guide to make the next steps clear and doable. I believe many creators need capture card help to move past basic limits, and that choice changes the quality of recorded play.
Investing in reliable capture cards gives you stable video, cleaner audio, and more control in your software,
Set your software to match resolution and frame rate. Test audio levels and monitor in real time. These small moves keep streams consistent and professional.
I hope this helps every streamer and gamer build a lasting channel. Keep learning new software features, trust good hardware, and enjoy sharing your games. Good luck on your journey.
FAQ
Do I need a capture card to record gameplay from my Switch and a DSLR at the same time?
Will my capture device work with Xbox One and other consoles too?
How important is USB 3.0 or USB-C for streaming and recording?
What cables and ports should I have on hand to set up quickly?
How do I manage audio from my console and my microphone at once?
What is zero-lag passthrough and why do I need it?
Can I use an internal PCIe capture board instead of an external device?
Which streaming software settings should I adjust first?
What causes color shifts or signal loss, and how do I fix them?
How do I choose the right option on a budget but still get good quality?
Will my laptop handle streaming and recording without dropping frames?
Are there platform or software limitations I should be aware of?

Lucas Bennett is a video capture and streaming expert who specializes in helping creators build high-performance setups. He shares in-depth reviews, setup guides, and optimization tips focused on capture cards and real-time video production, making complex tech simple and effective.